Happy Labor Day, everyone! Hope you all had a great weekend and were able to enjoy some time with friends and family. For us, this past weekend was mostly about getting things done around the house, and nothing makes me happier than that!
It’s been a while since we tackled anything DIY in our office. We took it from 0-60 back in the spring with new trim and fresh paint, but it hasn’t really been touched since then. You can read about our office transformation thus far in Bagel Office, Part 1 and Bagel Office, Part 2. I’ll let you in on the next step in the process towards total office perfection: Covering the walls. They were bagel and beautiful, but pretty empty. We are big believers in displaying frames (be it a Picasso or a picture of your granny) that are meaningful to you. We had a big space of wall between the basement door and the doorway to the living room that was begging for a gallery wall, or a set of pictures that are to placed together to make a big impact.
Here is that wall…

It’s begging for some sort of something, right? I knew a gallery wall would create a big impact while allowing us to showcase a lot of our favorite pictures at the same time. A friend of mine has one in her house that I love, so I knew I wanted to try it in our home, too. I wanted black frames so they would pop against the wall color (which reads differently in every picture and never accurately) and the white trim. I had a few on hand from random purchases over the years but we needed a lot more. I also knew that I wanted the frames to have different shapes, sizes and textures.
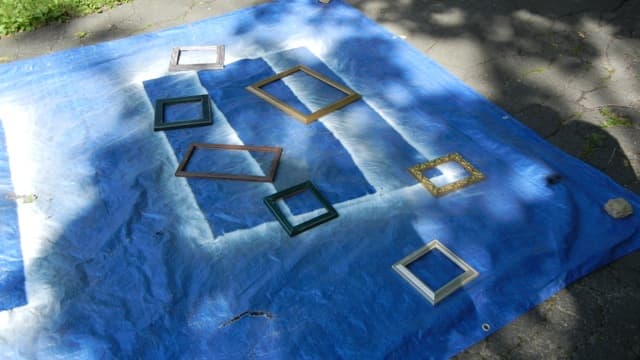
Cue our first trip to Goodwill since buying the house in ‘09. Kind of hard to believe, no? Well, it was rather anti-climatic as the frames were all stacked in a bin close to the entrance. We didn’t have to walk far. We ended up doing a loop anyway and I have to tell you, I wasn’t that impressed. The store wasn’t that clean and I didn’t think the “goods” were as inexpensive as I was expecting. We walked away with 6 or 7 frames for $30. I bet I might have done better at Christmas Tree Shop or a dollar store, but I did like how each frame from Goodwill was different and the textures, I will admit, were awesome. See that gold one? It’s one of my favorites. I knew it would look awesome painted a semi-glossy black.

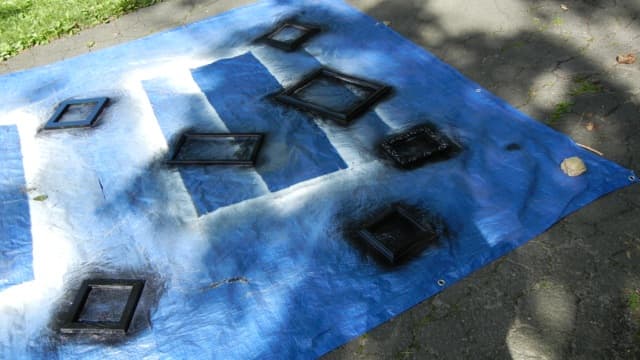
We removed the glass and windex-ed them clean. We scrubbed the frames and even gave them a light sanding so the paint would adhere optimally. Then we laid out the frames on a tarp on the driveway…
…and sprayed.
While the frames dried for a few days in the garage, I painstakingly chose the pictures I thought would make us happy up on our cheerful, orange-y wall. I ended up with a solid representation of siblings, parents, grandmothers, Griff and our wedding invite. Haha. I’m sure I will interchange them monthly every few years. I bought a few sheets of funky, white, textured cardstock on which to mount some of the pictures and also used some fabric I had laying around the house. Once I had the frames set and ready to hang, I rummaged through old cardstock to help me create a “tracing” for the frames so that I could play with the spacing I wanted without putting holes in the wall. I wanted it to look random and fun while keeping in mind that we would add a few more frames over time. I left space on the bottom left for a few more down the line.
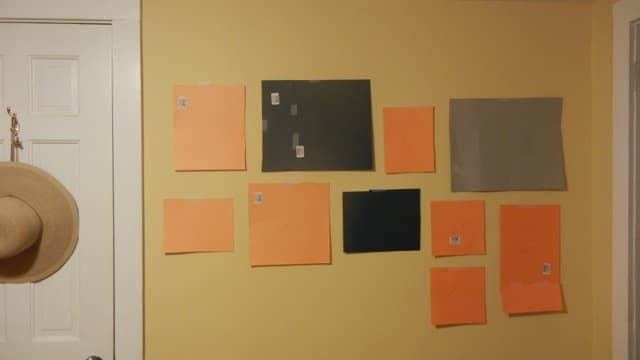
Once I had the “tracings” more or less where I wanted them, Matt came in and helped me hang all of the frames, after measuring where the hooks were on the back of each frame so that my “tracings” stayed pretty true to where the frames would end up.

Ten minutes later, we were in business. Bam.

And the view as you walk into the room…

The office is much more personal and I’m so happy to have those frames off the office floor! Ah! Improvements everywhere. Loving it.